
For months, I have been wracking my brain trying to find a workaround for a bug that I’ve found in Screaming Frog’s Memory Allocation settings.
I have plenty of physical RAM (8GBs in one, and 12+ in my home machine). Regardless of having the physical memory, I have been unable to allocate more than 1 GB of RAM to the Screaming Frog program without having the program crash. As it turns out, the issue lies within the Windows 10 Operating System’s Page File Size allocations limiting the memory for the program, causing it to consistently crash regardless of my physical memory.
ALLOCATING MEMORY TO SCREAMING FROG
Before I discuss the solution, let me explain the issue that I have been having. Screaming Frog initially allocates 512 MB of RAM for their crawls after each fresh installation. This can be an issue when crawling anything above a medium site since the program will stop the crawl and prompt you to save the file once the 512 MB is close to being consumed.
The issue that I have comes from allocating additional RAM to the program, through the ScreamingFrogSEOSpider.l4j file found within the program’s folder.
Normally, you can allocate additional RAM within this .txt file (as long as you have the physical hardware to run Screaming Frog, your Windows Program files, etc). If you don’t have the hardware & allocate more memory than you have, then the program will crash.
Operating System Restrictions
One of the first reasons for this memory restriction is the Operating System. Windows 32-bit systems will only allocate 4 GB of physical RAM, even if you have more hardware in your system. Upgrading to a 64-bit system opens your machine up to utilize any memory beyond the 4th GB.
I’m running machines with 8-20 GB of RAM, and for the longest time, I could not allocate more than 1 GB to the program before having it crash. My laptop, of all machines with 6 GB was able to allocate up to 3 GB (with the Windows system needing ~3GB at any given point), and it became my go-to machine for crawling larger sites. My laptop began to outperform my larger and more powerful desktops, which was very much a pain point.
After upgrading the RAM in my machine this morning, I realized that my Page File Space was set to only allocate 3 GB of RAM. (Page File Space is a partitioned space on your hard drive that acts as an extension of your RAM) Now I’m realizing I’m onto something.
HOW TO ALLOCATE ADDITIONAL PAGE FILE SPACE
If you find that your computer has more physical RAM available to use and that Screaming Frog crashes when you allocate additional memory, then I can help you out!
Check Your System Information (Step 1)
Open System Information. Right-click the Start menu, select Control Panel, System and Security, then Administrative Tools. Here you can access the System Information tab:

As you can see, my Page File Space is restricted
Increase the File Page Space (Step 2)

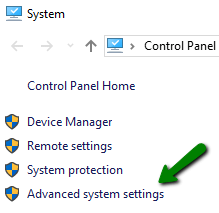
2.2) In the System Properties dialog box, find the Advanced System Settings tab, in the right side-bar to open the System Properties, Advanced tab.
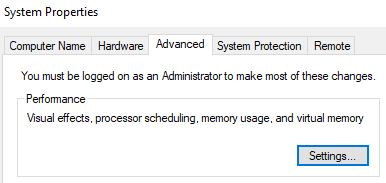
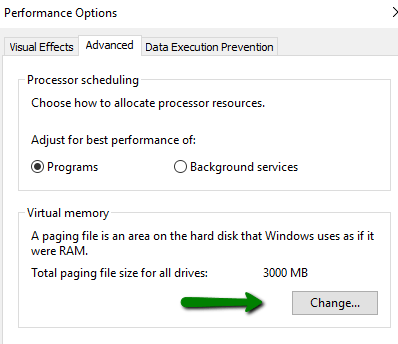
2.4) This opens the Performance Options window, and select the Advanced Tab. You will see a Virtual Memory dialog box, now select the Change Button
2.5) Now unclick the box that says “Automatically manage paging file size for all drives”, and click Custom Size
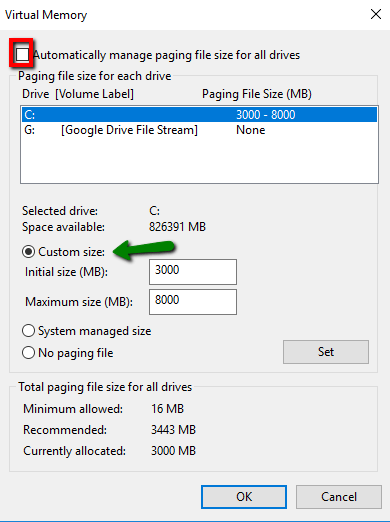
At this point, you will be able to set the custom size of your Page File Size. In this instance, I changed the initial sizing to 3000 MB, with a maximum sizing of 8000 MB. Set your limits, and click OK.
Now we’re cooking!
HOW TO INCREASE MEMORY ALLOCATION IN SCREAMING FROG:
Normally, you can skip all of step 2, and directly update the ScreamingFrogSEOSpider.l4j file found within the program’s folder. This is typically the first step to increasing memory allocation, but as I have found, it isn’t always the case.
Find the ScreamingFrogSEOSpider.l4j Program File (Step 3)
Make your way into the Program File for ScreamingFrog, and you will find ScreamingFrogSEOSpider.l4j. You should be able to edit this file in Notepad, or any other text editor.
NOTE: Some machines will not allow you to edit this file in the folder due to administrative protections. If you reach this error, copy the ScreamingFrogSEOSpider.l4j file to your desktop, and make a redundant copy into a separate folder. You can edit the desktop version of the ScreamingFrogSEOSpider.l4j file, then copy/paste it back into the ScreamingFrog program file to overwrite the existing file. The redundant copy in the separate folder is there, to ensure that you retain an original copy of the file in the case you crash the program or need to troubleshoot your memory allocation settings. (This is where memory allocation optimization for Screaming Frog comes into to play, and you will not have to incrementally increase Memory amounts once you find an acceptable level.)
Step 3.1) Update Screaming Frog Memory Allocations:
At this point, you will need to adjust the Memory Allocations based on your own system’s hardware.
The original file allocation is usually set to 512MB, and most users can get by with increasing the memory allocation to 2-4 GB based on the sites they crawl. I myself am in the search for power and wanted to test the limits at 8GB.
Here is how the file is currently laid out:
# Memory values: You can use either the g suffix for gigabytes, or M for megabtyes.
#
# Examples:
#
# 1GB: -Xmx1024M
# 2GB: -Xmx2048M
# 4GB: -Xmx4g
# 8GB: -Xmx8g
# 16GB: -Xmx16g
#
# Change the value on the following line to allocate more memory to the spider.
-Xmx8g
# NOTE: If Windows will not allow you to edit the file directly
# (you will probably need administration rights), try copying the file to your
# desktop, editing and then pasting back into the folder and replacing the original file.
The bolded “Xmx8g” is the section of the file that you will update to increase the Memory Allocation for your Screaming Frog crawler.
TESTING SCREAMING FROG
After you have updated and saved the ScreamingFrogSEOSpider.l4j file to the proper location, you will need to initialize the Screaming Frog program to test the configuration.
If the program crashes, then you have allocated too much memory to the system, and you will need to repeat step 2 & 3. Increase the Page File Memory in step 2, and decrease the memory that you allocate for the system in step 3, save the file, and try to run Screaming Frog again.
If the program initializes, Congratulations! You have successfully increased the amount of memory that Screaming Frog can allocate to a crawl. At this point, I recommend that you find a large site to test the limits of your newly upgraded Screaming Frog crawler to determine if you hit any walls regarding file size.
LOOKING FOR A SITE AUDIT?
Websites can take a form like no other, and over time it can be difficult to determine how users interact with your site, and what processes can be improved to help visitors convert. Problems can compound on each other, and over time they can affect the page load speed of your website, usability, and conversion rates. Our team at Hive Digital has developed a successful auditing strategy that can greatly improve your user’s experience on your website.
If you would like to learn more about our SEO site audits please call us today at 1-800-650-0820 or contact us directly at [email protected]JUMP TO A CATEGORY
WEB ANALYTICS | SEARCH OPTIMIZATION | PAID ADVERTISING | COMPANY NEWS